


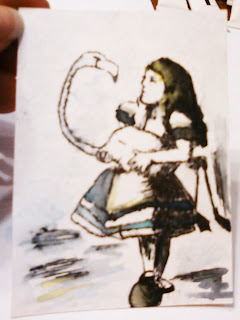
Saturday, January 30, 2010
30: Alice Artist trading card
Today I created an artist trading card for an alice in wonderland themed swap. This was my end result :) It is pen and watercolor, although the pen did bleed a little more than I had planned for.
Friday, January 29, 2010
29: Hobby lobby ad
This is a mockup I created for my hobby lobby ad in illustration class. The final I'll post next week. It is made from pencil and charcoal. :)

- Posted using BlogPress from my iP0d Touch
- Posted using BlogPress from my iP0d Touch
28: Hello kitty atc
Today I created an artist trading card for a hello kitty themed swap. The colors are not verygood in this photo of it, but at least you get the idea.

- Posted using BlogPress from my iPod Touch
- Posted using BlogPress from my iPod Touch
Thursday, January 28, 2010
27: Finally, my self portrait
Now I can show you my final self portrait. This was painted in photoshop... if I had to guess how long it took, I would say 12 or 14 hours. Just a guess. This is my first time really painting in photoshop. I really like it :)


Wednesday, January 27, 2010
26: Tick tock flash clock
Todays update is a flashy one ;) This clock was made in flash (the background designed in photoshop) Just a quick little creative tid bit. I would tell you where to find a tutorial on how to do it, but really I don't know. Hope you enjoy.
(by the way, Blogger wont let me upload a flash video to my blog so I had to upload the video of it working to something else. The flash file itself actually adjusts the hands to the correct time. SO click on the image below to see the video of my clock in action)

(by the way, Blogger wont let me upload a flash video to my blog so I had to upload the video of it working to something else. The flash file itself actually adjusts the hands to the correct time. SO click on the image below to see the video of my clock in action)
Tuesday, January 26, 2010
25: Photoshop self portrait update
Here is just a quick update on what i've been doing all night! (I'm pretty busy this week, so I didn't have time to make something specifically for the blog) It's not really a huge creative post, but I am going to count it anyway. The full finished piece will be posted in the next few days, but until its finished im just going to give a little peak. SO here is one part of my self-portrait. This was done in photoshop. It has taken hours and hours, and I am guessing even a few hours more. So enjoy ;)


Monday, January 25, 2010
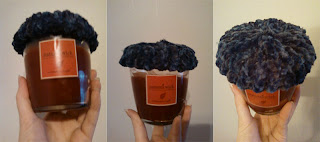
24: Candle cover
Today I created a little candle cover. Or it could be a jar cover as well. I found a cool little how to online and decided to try it. FIND IT HERE! :D

Sunday, January 24, 2010
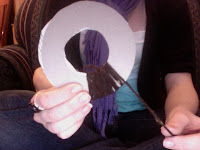
23: POM POMs!
This is how to make those cool yarn pom poms!
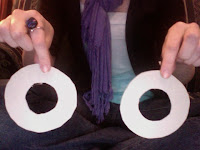
STEP 1 > Cut out two cardboard circles and cut a hole in the center. The bigger the outter rim of the circle the bigger the pom pom is. Place the circles back to back.
STEP 2 > Cut a very long piece of string and start wrapping it around the cardboard circles. If you would like you can add different colors of string, or if you run out you can add more. Just secure the ends while wrapping.
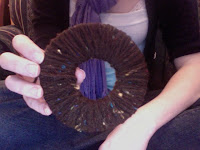
STEP 3 > Continue until you have thickly covered your circle. The thicker the yarn is, the bigger your pom pom will be.
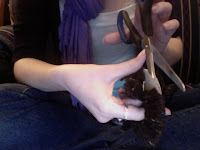
STEP 4 > Use a pair of scissors to cut the string in between the two cardboard circles.
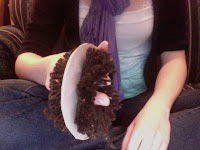
STEP 5 > This is what it looks like after cutting the yarn.
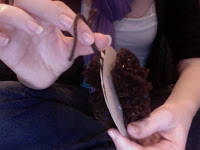
STEP 6 > Cut another piece of yarn and slide it inbetween the cardboard circles. Tie the strings and either cut or slide off the cardboard rings.
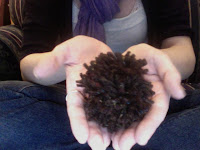
STEP 7 > Cut any extra long strings. You have your pom pom!

STEP 1 > Cut out two cardboard circles and cut a hole in the center. The bigger the outter rim of the circle the bigger the pom pom is. Place the circles back to back.

STEP 2 > Cut a very long piece of string and start wrapping it around the cardboard circles. If you would like you can add different colors of string, or if you run out you can add more. Just secure the ends while wrapping.

STEP 3 > Continue until you have thickly covered your circle. The thicker the yarn is, the bigger your pom pom will be.

STEP 4 > Use a pair of scissors to cut the string in between the two cardboard circles.

STEP 5 > This is what it looks like after cutting the yarn.

STEP 6 > Cut another piece of yarn and slide it inbetween the cardboard circles. Tie the strings and either cut or slide off the cardboard rings.

STEP 7 > Cut any extra long strings. You have your pom pom!
22: Typography art
Oh no! Behind again :P I'll try to do as many as I can today... This is a quick one i put together... nice effect though.
Find the tutorial at Reader Tutorial

Find the tutorial at Reader Tutorial

Thursday, January 21, 2010
21: cheating?
Well, I am super busy today so I am posting something I did in the past :P along with a preview of something to come.
First, here is a candy wrapper design for the holidays I created maybe a year ago? I believe it was in photoshop and used some istock photos.
Next we have a preview of something that you will have to wait to see the end of. It is a self-portrait painted in photoshop. It is due next thursday, so hopefully it will be done by then. I am on the hardest part now... the face and the hair. (the pic i am uploading is not as good quality as what I am creating :P )

First, here is a candy wrapper design for the holidays I created maybe a year ago? I believe it was in photoshop and used some istock photos.

Next we have a preview of something that you will have to wait to see the end of. It is a self-portrait painted in photoshop. It is due next thursday, so hopefully it will be done by then. I am on the hardest part now... the face and the hair. (the pic i am uploading is not as good quality as what I am creating :P )

Wednesday, January 20, 2010
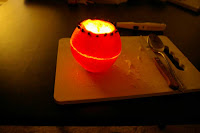
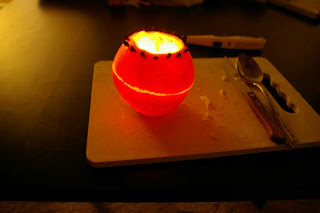
20: Orangesh you glad i didnt say bannana!
This next project could come in handy for a fancy get-together. They add a fantastic citrus smell to the air around, and a pleasing candle holder..... for very cheap. ;) I could just add the finished photo... but for this one, instead of sending you to the site where I found this cool project (beekman) I will post step by step how it was done!
Here is what the final will look like:
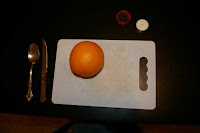 Step 1: Gather supplies. You will need:
Cutting board
knife
tea-light candle
spoon
orange
cloves
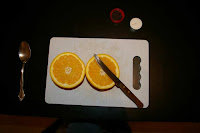 Step 2: Cut the orange in half
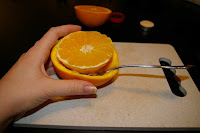
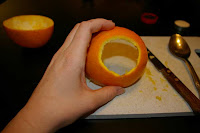
 Step 3: Cut the orange flesh from the sides of the rind on both halves.
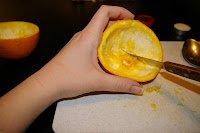
 Step 4: Scrape out the flesh with a spoon. (You can eat the insides if you like. We dont need them)
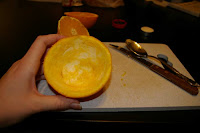 Step 5: Scrape out any extra leftover bits of orange flesh that is on the sides.
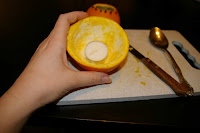
 Step 6: Cut a shape out of what you would like the top of the candle to be. This is where the heat and smoke will come out of. You can use a cookie cutter if you would like a more specific shape.
 This is what the cut out shape looks like.
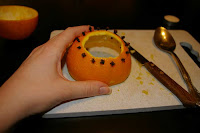 Step 7: Add cloves to the top for an extra visual element. It also adds to the smell!
 Step 8: Place candle inside of the bottom half.
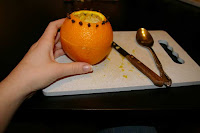 Step 9: Put the two halves together and light the candle!
Finished project!
Here is what the final will look like:

 Step 1: Gather supplies. You will need:
Cutting board
knife
tea-light candle
spoon
orange
cloves
 Step 2: Cut the orange in half
 Step 3: Cut the orange flesh from the sides of the rind on both halves.
 Step 4: Scrape out the flesh with a spoon. (You can eat the insides if you like. We dont need them)
 Step 5: Scrape out any extra leftover bits of orange flesh that is on the sides.
 Step 6: Cut a shape out of what you would like the top of the candle to be. This is where the heat and smoke will come out of. You can use a cookie cutter if you would like a more specific shape.
 This is what the cut out shape looks like.
 Step 7: Add cloves to the top for an extra visual element. It also adds to the smell!
 Step 8: Place candle inside of the bottom half.
 Step 9: Put the two halves together and light the candle!
Finished project!

Tuesday, January 19, 2010
19: Some creative text
This was done with a tutorial I found :) Maybe it will come in handy sometime in the future. You can find the tutorial at 10steps.


18: Loose 20 pounds in 5 minutes!
This is a certain celebrity before and after a photoshop slimming session. Mostly used the liquefy tool in photoshop. some cloning as well.
Before

After

Before

After

Monday, January 18, 2010
17: I have a dream!
This project is in spirit of Martin Luther King day. :) It is all acrylic paint, With the first 2 paragraphs of his speech (plus a sentence or two).
The video explains alot, but i started with black acrylic paint on paper then taped a cutout of MLK onto it and wrote on that. :)

The video explains alot, but i started with black acrylic paint on paper then taped a cutout of MLK onto it and wrote on that. :)

You can read the full speech on American Rhetoric. Or watch it on YouTube.
Saturday, January 16, 2010
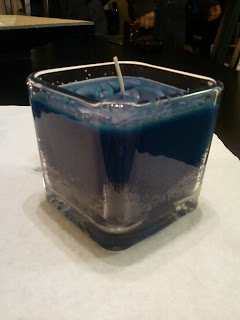
16: Creative candles
Today I decided to try making some candles. They are sented and everything. The small square one was made with ice. Just experimenting. This may lead to other candle projects in the future :)


Friday, January 15, 2010
15: Creative web design
This is a website for a school I made up Creative King art center. :) Perhaps can be used for something else ;) I will probably come up with more versions later, this is more of a quick idea.


Thursday, January 14, 2010
14: Artist Trading Card Bird
This Trading card is being sent off to Pennsylvania. Not my favorite... and I think I could have done better, but it is alright.


13: An EYE for you
Today I created an eye in photoshop for my "creative thing of the day." I have been a little nervous to try the whole photoshop painting out, but i think that my experiment turned out really well. :)


Wednesday, January 13, 2010
12: Fun with Glass and paint
For this creative project, i was browsing through a book at barnes and noble and found a fun craft. I decided to try it out. Here are the results :)
BEFORE & AFTER


BEFORE & AFTER


Tuesday, January 12, 2010
11: An Absolut advertizement
We were asked to create Absolut advertisements today in class as a "warm up". The requirements were 8" X 11", use 3 medias, and mimic an Absolut ad. I used cards, a print off, and pastels. :D


Monday, January 11, 2010
10: A useful recycled craft
Today for my creative little project I created a popcan lantern. Although mine does not look quite as good as the ones i found online, I tried :) An interesting project to be sure.
You can find the tutorial here: popcan lanterns

You can find the tutorial here: popcan lanterns

Sunday, January 10, 2010
9: Illustrator tattoo
This is a vector of a tattoo drawing by my brother. I didnt do the design, but I did make it into a vector. So this is my 9th creative posting :) I know I am one behind... :P I'll catch up I promise!


Saturday, January 9, 2010
8: Playing with words
This creative project was an experiment with some designs with words. I found this tutorial at tutorialized.
Have fun expirementing :)
Have fun expirementing :)

Thursday, January 7, 2010

6: E=MC?
Finally... Today's (Wendsday 6th) post. It is WAY later then i thought it would be. And this has been more of an experiment and I hope a more refined better sort of version can be posted another day. But many grey's anatomy episodes and cups of tea later... the results are here :)
Check it out.
Check it out.
Wednesday, January 6, 2010
5- Make up!
I missed yesterday! I'll flat out admit... I was lazy. Sat on my couch and watched greys anatomy. I just got the 5th season from itunes. YAY - >
So this is the Make up post. It is mister John locke created in a very interesting program called ArtRage. ( Find it at artrage.com )
I really love the wacom tablets and I used one with this, but I dont own one sadly.
And before I head out: a locke quote of course "A leader can't lead until he knows where he's going."
(( ALSO... another post will be later tonight. A special treat of sorts -and my post for the day ))

Monday, January 4, 2010
4: Playing with light

Another photoshop fun creative project. this time i found a tutorial for a cool light effect. I played around here and there. Maybe I'll be able to incorporate it somehow into a photo or design sometime. You can check it out here: http://photoncubetutorials.blogspot.com/2006/04/photoshop-light-beam.html
Coming up I'll be uploading a special project. Hopefully within the next day or so :)
Sunday, January 3, 2010
Posting número tres!
Alright this time it is a digital piece. A quick tutorial I found online :) here is before and after


- Posted using BlogPress from my iPhone
- Posted using BlogPress from my iPhone
Saturday, January 2, 2010
Creative item #2
This is my second posting and second creative piece. It is a quick one as my cousins have kept me very busy today. :). Not complaining

- Posted using BlogPress from my iPhone
- Posted using BlogPress from my iPhone
Buy artwork

Subscribe To


About Me

- bcreative2010
- Well, I started this blog to try and create one piece of something creative a day. This plan did not work out too well... I have decided I would much rather have quality blog posts instead of quantity. SO with that decision this is now my creative canvas. I will spill all of my Ideas, inspirations, and creative processes to this one page. I hope with my words and ideas I can inspire others to awaken their creative minds as well. I'ld love to hear any suggestions, ideas, opinions or criticisms. So, here we go friends... Open the flood gates.